Introduction
Building a fence can look like an overwhelming job, specifically if you're favoring materials like Colorbond. For do it yourself lovers, nevertheless, the journey of installing a Colorbond fence can be satisfying and gratifying. With the right assistance, tools, and a sprinkle of determination, producing a strong and aesthetically pleasing border around your home is totally possible. In this article, we'll delve deep into Colorbond fence setup ideas for DIY enthusiasts, covering everything from planning and preparation to the last touches that make your fence stand out.
What is a Colorbond Fence?
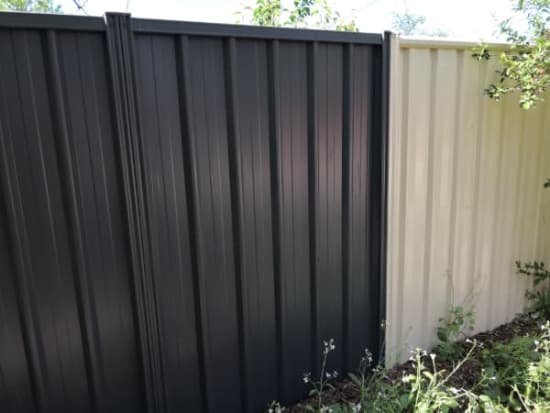
A Colorbond fence is not simply any common fence; it's a resilient, elegant barrier made from pre-painted steel that has gained immense appeal in Australia. Known for its durability versus harsh weather conditions and minimal upkeep requirements, a Colorbond fence offers both performance and aesthetic appeal. The variety of colors readily available allows house owners to pick options that fit their property's design perfectly.

Benefits of Choosing a Colorbond Fence
Durability: Unlike traditional wood fences that can rot or warp over time, Colorbond fencing is developed to hold up against the test of time. Low Maintenance: A simple wash with soap and water keeps your Colorbond fence looking fresh. Variety of Styles: Readily available in various colors and designs, you can tailor the appearance of your fence to complement your home.Planning Your Colorbond Fence Installation
Assessing Your Property
Before diving into installation, it's crucial to assess your residential or commercial property's limits accurately. Comprehending where exactly your fence will sit assists avoid disagreements with next-door neighbors later on.
Tools Required for Assessment
- Tape Measure Level Marker or Spray Paint
Understanding Regional Regulations
Before any construction begins, familiarize yourself with regional regulations regarding fencing. Some areas have specific guidelines about height or products used.
Key Indicate Consider
- Height restrictions Permits required Setback lines from residential or commercial property boundaries
Gathering Essential Materials
Essential Tools for Installation
Your toolkit should consist of:
- Hammer Power drill Screwdriver set Level Concrete mixer (if necessary)
Sourcing Quality Materials
When it concerns building a durable Colorbond fence, quality matters! Search for reputable suppliers who provide real products.
Recommended Suppliers
Local Hardware Stores Online Retailers Specialty Fencing SuppliersChoosing the Right Colorbond Fence Design
Popular Designs Available
With many designs readily available, discovering the right one might be challenging. Here are some popular options:
Flat Top Panels: Ideal for contemporary aesthetics. Lattice Leading Panels: Adds elegance while enabling light through. Post-and-Rail Style: A standard appearance that suits rural properties.Matching with Your Home's Architecture
Consider how the design you pick boosts or contrasts with your existing architecture.
Colorbond Fence Installation Tips for Do It Yourself Enthusiasts
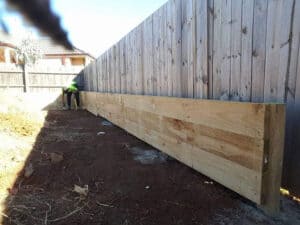
Once you've prepared everything out and collected all essential materials, it's time to start installation! Here are some essential pointers:
Start at One Corner: Constantly start from one corner post and work your way across. Use String Lines: They help make sure each panel remains straight. Check Level Frequently: Utilize a level tool after setting up each panel to guarantee uniformity.Step-by-Step Guide to Installing Your Colorbond Fence
Step 1: Mark Your Boundary Line
Using stakes and string lines, mark where you desire your fence posts installed.
Step 2: Digging Post Holes
Dig holes according to regional depth guidelines (generally about 600mm).
Step 3: Setting up Posts
Place posts in holes guaranteeing they're plumb utilizing a level.
Step 4: Securing Posts in Concrete
Mix concrete according to package directions and protect each post securely in place.
Step 5: Attaching Panels
Slide panels into the grooves of posts safely securing them based on producer specifications.
Safety Factors to consider Throughout Installation
Always use appropriate safety gear consisting of gloves and goggles throughout installation to protect yourself from potential injuries.
Maintenance Tips After Installation
After successfully installing your Colorbond fence, upkeep is crucial to longevity:
Regular Cleaning: A gentle wash gets rid of dirt buildup. Inspect for Damage: Frequently inspect panels for rust or dents. Trim Surrounding Vegetation: Guarantee no plants rub against the panels triggering damage over time.FAQs About Colorbond Fencing
What is the life expectancy of a Colorbond fence?
Colorbond fences typically last between 20-- 30 years when maintained effectively due to their toughness against weather condition elements.
How do I select the best color?
Choose colors based upon personal choice but likewise consider community patterns or home outside colors for aesthetic coherence.
Can I install a Colorbond fence by myself?
https://outstandingfencing.com.au/colorbond-fencing/Absolutely! With correct preparation and tools at hand, many DIY lovers successfully install their own fences every year!
Do I need an authorization for installation?
This differs by place; check local regulations before beginning any work on your property!
Conclusion
Installing a Colorbond fence may appear daunting in the beginning glance; nevertheless, equipped with these thorough tips tailored particularly for do it yourself lovers like yourself-- success is simply around the corner! By comprehending products required, gathering quality materials from trustworthy Colorbond fence makers or suppliers, following organized actions throughout setup while keeping maintenance practices in mind-- you'll not only boost your residential or commercial property's worth but likewise develop an attractive limit that lasts years! So roll up those sleeves; let's get building!